


There’s something undeniably magical about sushi-the artful balance of fresh ingredients, delicate textures, and vibrant flavors, all wrapped up in a perfect bite. While sushi might often evoke images of sleek restaurants and skilled chefs wielding razor-sharp knives, the truth is that crafting your own sushi at home is an accessible, rewarding adventure waiting to be unfolded. Welcome to Roll Your Own: The Ultimate Guide to Making Sushi at Home, where we’ll take you step-by-step through the essentials of sushi-making, from selecting the freshest fish and mastering the rice to rolling your very first maki. Whether you’re a curious novice or a seasoned foodie looking to sharpen your skills, this guide promises to transform your kitchen into a sushi haven-one roll at a time.
Roll Your Own sushi at home is an adventure that unfolds from selecting the freshest ingredients to mastering the art of rolling delicate, mouthwatering bites. This beloved Japanese culinary tradition balances precision with creativity, showcasing subtle flavors and textures that celebrate simplicity and freshness. My own journey began with a humble attempt inspired by an authentic Tokyo sushi bar, and nothing compares to the satisfaction of creating perfect sushi rolls from scratch – a harmony of fragrant rice, crisp veggies, and luscious seafood or vegetarian fillings.
Prep and Cook Time
- Preparation: 30 minutes
- Cook time: 20 minutes
- Total time: 50 minutes
Yield
Serves 4 (makes approximately 8 sushi rolls)
Difficulty Level
Medium – beginner-amiable with practice
Ingredients
- 2 cups sushi rice (short-grain Japanese rice)
- 2 1/2 cups water
- 1/3 cup rice vinegar
- 3 tablespoons sugar
- 1 teaspoon fine sea salt
- 8 sheets nori (seaweed sheets)
- 1 large cucumber, julienned
- 1 ripe avocado, sliced thinly
- 200g fresh sashimi-grade salmon or tuna, cut into strips
- Fresh crab meat or cooked shrimp (optional choice protein)
- 2 tablespoons toasted sesame seeds
- Soy sauce, for dipping
- Wasabi and pickled ginger, to serve
- Bamboo sushi rolling mat
Instructions
- Rinse the rice thoroughly under cold water until the water runs clear, removing excess starch to prevent mushy texture.
- Combine rinsed rice and 2 1/2 cups water in a rice cooker or saucepan. Let it soak for 30 minutes before cooking – this hydrates grains evenly.
- Cook rice according to your cooker’s instructions or bring to a boil, then simmer covered over low heat for 18 minutes. Remove from heat and let rest 10 minutes without lifting the lid.
- While rice cooks, gently heat rice vinegar, sugar, and salt in a small saucepan just until dissolved; allow to cool.
- Transfer hot rice to a large wooden or glass bowl. evenly drizzle the vinegar mixture over rice,folding carefully with a wooden spatula to coat without mashing. Fan the rice concurrently to cool it quickly and develop a shiny texture.
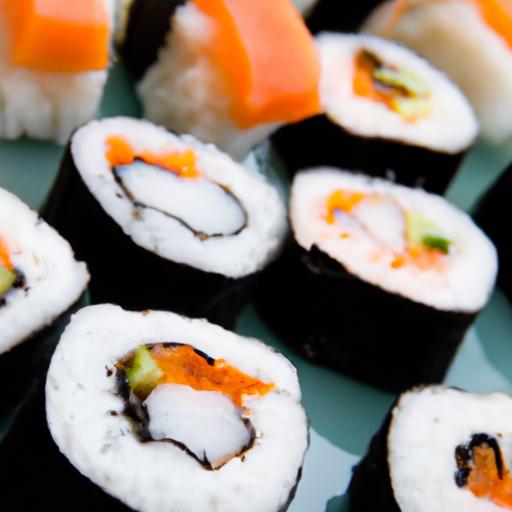
- Place a sheet of nori onto the bamboo mat, shiny side down. With wet hands, spread a thin, even layer of sushi rice over the nori, leaving a 1-inch border at the top edge for sealing.
- Arrange your fillings – cucumber, avocado, and fish or seafood - lengthwise about 1 inch from the bottom edge of the rice-covered nori.
- Using the bamboo mat,start rolling tightly from the edge closest to you,pressing gently but firmly,making sure the roll stays intact without gaps.
- Once rolled, lightly moisten the border edge of the nori and seal the roll. Use the mat to shape the roll into an even cylinder.
- with a sharp knife dipped in water, slice the sushi roll into 6 to 8 equal pieces, wiping the knife after each cut to prevent sticking.
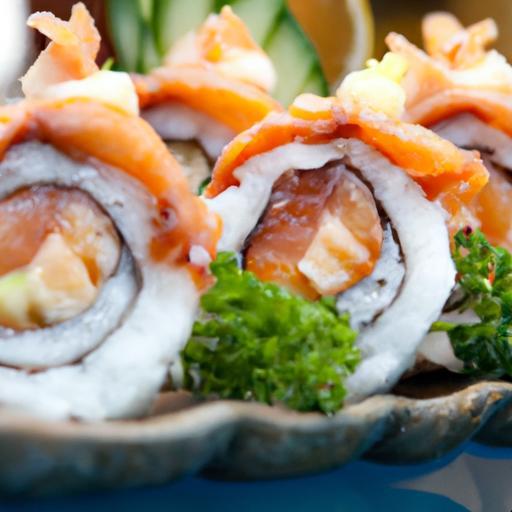
- Sprinkle with toasted sesame seeds and serve with soy sauce, wasabi, and pickled ginger for an authentic touch.
Chef’s Notes and Tips for Success
- Rice quality is key: Use short-grain sushi rice and avoid long-grain or basmati varieties for the perfect stickiness.
- Keep your hands moist: Wetting your hands with vinegar water while spreading rice prevents it from sticking to your fingers.
- Rolling practice: Don’t rush the rolling process; tight but gentle pressure ensures neat sushi rolls that hold together.
- Fillings flexibility: Feel free to swap proteins with cooked eel, smoked salmon, or tofu for a vegetarian punch; crisp veggies like bell pepper and carrots bring colorful crunch.
- Make ahead: Sushi rice is best used fresh but can be covered with a damp cloth at room temperature for up to 2 hours without drying.
- Vegetarian variation: Replace seafood with marinated shiitake mushrooms or pickled radish for depth of flavor.
Serving Suggestions
Present your sushi rolls sliced neatly on a long rectangular plate with small mounds of wasabi and pickled ginger artistically arranged alongside. Garnish with thinly sliced scallions or microgreens for a fresh pop of color. For a refined touch, serve with a small bowl of miso soup and chilled green tea. Encourage guests to dip their rolls lightly in soy sauce, savoring the layered textures and vibrant flavors of your handcrafted sushi.

| Nutrient | Per serving (2 rolls) |
|---|---|
| Calories | 280 kcal |
| protein | 15 g |
| Carbohydrates | 40 g |
| Fat | 5 g |
For more inspiration on culinary techniques and sushi styles,check out our Japanese cooking basics. Additionally, the Japanese Cooking 101 guide offers an excellent deep dive into authentic sushi rice preparation.
Q&A
Q&A: Roll Your Own: The Ultimate Guide to Making Sushi at home
Q1: What are the essential ingredients needed to start making sushi at home?
A1: to embark on your homemade sushi adventure, you’ll want sushi-grade rice, nori sheets (seaweed), a variety of fresh fish or seafood like salmon or tuna, crisp vegetables such as cucumber and avocado, rice vinegar, soy sauce, wasabi, and pickled ginger. Having a bamboo rolling mat (makisu) is also essential for that perfect roll!
Q2: How do I know if the fish I’m buying is safe for sushi?
A2: Always purchase sushi-grade or sashimi-grade fish from reputable fishmongers or specialty markets. These are specially handled and frozen to eliminate parasites, ensuring they’re safe to eat raw. If you’re ever in doubt, ask your vendor about the origin and handling of the fish.
Q3: Can I make sushi without raw fish?
A3: Absolutely! Vegetarian or cooked sushi options are tasty and beginner-friendly.Consider fillings like roasted sweet potato, tempura vegetables, crab stick (imitation crab), smoked salmon, or even grilled shrimp.The key is to focus on fresh, vibrant ingredients.
Q4: What’s the trick to perfect sushi rice?
A4: Rinsing your rice thoroughly until the water runs clear removes excess starch for fluffier grains. Cook it with the right water ratio, then gently fold in a mixture of rice vinegar, sugar, and salt while it’s still warm. let it cool to room temperature before using-it should be sticky but not mushy.
Q5: How do I prevent my nori sheets from turning soggy?
A5: Work quickly once you’ve spread the rice on the nori, and avoid adding too much moisture-heavy ingredients. Also, keep the nori sheet dry before you start; if it absorbs moisture from your hands or the habitat, it can become limp and tear easily.
Q6: What are some fun fillings I can experiment with beyond the classics?
A6: Think outside the box! Try pickled radish for a tangy crunch, mango for a sweet contrast, spicy mayo for a creamy kick, or even tempura flakes for a deep-fried crunch. The beauty of making sushi at home is you get to mix and match flavors to suit your palate.
Q7: How do I roll sushi tightly without squishing the ingredients?
A7: Use a bamboo mat to apply even pressure as you roll. start by tucking the edge closest to you under the filling, then gently but firmly press and roll forward. The mat helps shape the roll without crushing it. Remember: practice makes perfect!
Q8: Can I prepare sushi rice and fillings in advance?
A8: Sushi rice is best used fresh or on the same day for optimal texture, as it can harden or dry out over time. Fillings like sliced vegetables or cooked seafood can be prepped ahead and kept refrigerated, which makes the rolling process quicker and more enjoyable.Q9: What are some plating and serving tips to elevate my homemade sushi experience?
A9: Presentation is part of the joy! Arrange rolls with garnishes like thinly sliced scallions, sesame seeds, or microgreens. Serve on a clean, minimalist plate with small dishes of soy sauce, wasabi, and pickled ginger for authenticity.Don’t forget chopsticks for the full effect!
Q10: Any final advice for sushi rookies?
A10: Don’t be intimidated-the art of sushi making is all about enjoying the process and discovering your favorite combinations. Start simple, embrace imperfections, and make it a fun, creative kitchen adventure. Soon, you’ll be rolling like a pro!
The Conclusion
As you sharpen your knives and gather your ingredients, remember that making sushi at home is more than just a culinary task-it’s an art, a journey, and a festivity of creativity rolled into every bite.With this guide in hand, you’re equipped to transform simple rice and seaweed into stunning, flavorful masterpieces that rival your favorite sushi bar. So, embrace the rhythms of rolling, the harmony of flavors, and the joy of crafting something truly your own. Your sushi adventure starts now-happy rolling!