


There’s something deeply satisfying about the aroma of freshly baked bread wafting through your kitchen-a simple pleasure that transforms any space into a comforting haven. While artisan loaves and elaborate recipes frequently enough steal the spotlight, the humble basic white loaf remains a timeless staple, a canvas of softness and flavor that pairs effortlessly with everything. Thanks to the modern convenience of bread makers, mastering this quintessential bread has never been more approachable. In this article, we’ll explore how to harness your bread maker’s potential to craft the perfect basic white loaf-crispy crust, tender crumb, and that irresistible homemade essence-turning your countertop appliance into a gateway to baking confidence and appetizing simplicity.
Choosing the Perfect ingredients for Fluffy White Loaf Perfection
Mastering the art of basic white loaf in your bread maker begins with selecting the right ingredients that work harmoniously to create that irresistibly fluffy crumb and beautifully golden crust. Quality flour,fresh yeast,and the correct balance of liquids and fats all play a starring role in crafting a loaf that’s soft yet structured,light yet satisfying.
Start with strong bread flour for optimal gluten development-it’s the backbone of your loaf’s chewy softness and elastic texture. Avoid generic or low-protein flours, which can yield a dense or crumbly crumb. Combine this with active dry yeast or instant yeast-both are reliable, but instant yeast often integrates more quickly, easing your bread maker’s job.
Water temperature is crucial here; lukewarm water (around 105-110°F/40-43°C) activates the yeast without killing it, unlocking natural dough rise. For richer flavor and tender crumb, a touch of butter or high-quality vegetable oil adds moisture and depth. Fine-tuned salt enhances taste while regulating yeast activity.

Prep and Cook Time
- planning: 10 minutes
- Rising and Baking: 3 hours (bread maker cycle dependent)
- Total time: Approximately 3 hours 10 minutes
Yield
Makes one loaf, approximately 750 grams, serving 8 slices.
Difficulty level
Easy to Medium - Ideal for beginners eager to create consistently prosperous white bread with minimal fuss.
Ingredients
- 3 cups (375g) strong bread flour, sifted
- 1 ¼ cups (300ml) lukewarm water (105-110°F / 40-43°C)
- 2 tablespoons (30g) unsalted butter, softened
- 2 tablespoons (25g) granulated sugar
- 1 ½ teaspoons salt
- 2 teaspoons instant yeast
Instructions
- add Ingredients to the Bread Maker: Layer the ingredients inside your bread maker’s pan precisely in this order: water, softened butter, sugar, salt, flour, and finally yeast on top (make sure salt and yeast don’t touch).
- select the Basic White Loaf programme: Choose the basic or white bread setting, typically around 3-hour cycles including kneading, proofing, and baking.
- Monitor Dough Consistency: After 5-10 minutes of kneading,open the lid briefly to check dough texture. It shoudl form a slightly tacky, smooth ball. Add a teaspoon of water or flour if too dry or wet, respectively.
- Let the Bread Maker Do the Work: Close the lid and allow the machine to complete its kneading and proofing cycle. This steady surroundings ensures ideal gluten development and yeast activity.
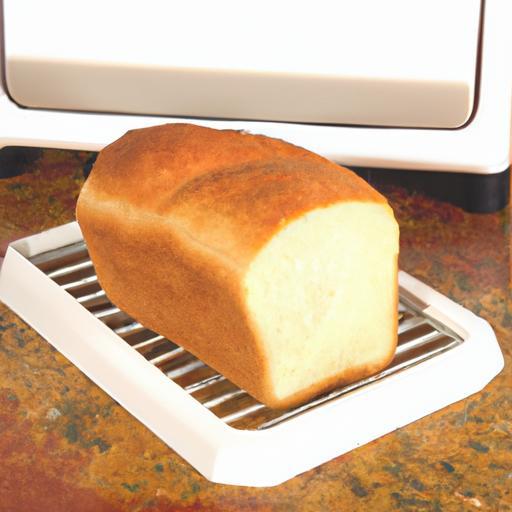
- Baking and Cooling: Once the bake cycle ends with a crisp golden crust, carefully remove the bread pan. let the loaf cool on a rack wholly before slicing. This resting improves crumb structure and flavor.
Unlocking the Secrets of dough Kneading and Proofing in Your Bread Maker
The magic behind mastering the art of basic white loaf in your bread maker lies in consistent kneading and perfectly timed proofing. Kneading energizes the flour proteins, weaving gluten networks that trap air bubbles from yeast fermentation-this is what creates that soft, airy crumb. Your bread maker’s paddle efficiently mimics traditional hand-kneading motions, but staying vigilant during the initial phase can greatly improve outcomes.
Proofing in a controlled warm environment is just as vital. If dough fails to rise adequately, a dense loaf awaits. Factors like ambient temperature, yeast freshness, and accurate liquid ratios serve as gatekeepers to your perfect risen loaf. the bread maker’s airtight lid and temperature regulation simplify this process, ensuring less guesswork for you.
Temperature and Timing Tips to Achieve the Ideal Crust and Crumb
Understanding your bread maker’s distinct temperature phases is key to mastering the art of basic white loaf in your bread maker. During the final bake, internal bread temperature hits roughly 190°F (88°C), signaling doneness. Avoid prematurely opening the lid,as temperature fluctuations can cause your crust to sag or the loaf to collapse.
If your crust bakes too dark or thick, use the “crust color” setting to select light or medium crusts. For a crisper crust, try briefly removing the loaf from the pan right after baking and placing it in the oven for 5 minutes at 350°F (175°C).This approach also improves crumb moisture distribution.
Troubleshooting Common White Loaf Challenges for Consistent Results
Even seasoned bakers face a few hurdles while mastering the art of basic white loaf in your bread maker. If your bread is too dense or heavy, double-check yeast expiration and flour type first-using all-purpose flour can sometimes reduce gluten strength. Also, ensure the dough ball is not overly dry or wet; moisture balance is crucial.
A collapsed or sunken loaf often results from over-proofing or rapid cooling. Avoid removing the bread too early, and let it rest fully before slicing. If your crust is excessively hard or thick,reduce bake time slightly or select a lighter crust setting.
For those finding the loaf too bland, try enhancing sugar slightly or adding a teaspoon of powdered milk to enrich flavor subtly without overpowering the white loaf’s delicate profile.
Chef’s Notes
- Substitute butter with an equal amount of vegetable oil for a dairy-free option without compromising softness.
- For a touch of rustic charm, replace ½ cup of bread flour with whole wheat flour, but expect a denser crumb.
- Store your loaf in an airtight container or wrapped tightly in foil to maintain freshness; slice only when cool.
- use filtered or bottled water if your tap water is heavily chlorinated, which may inhibit yeast activity.
- Refer to our guide on kneading techniques for bread machines to further refine dough development skills.
Serving Suggestions
This white loaf is a versatile canvas-serve it toasted with creamy butter and your favorite preserves for breakfast, or use as the base for gourmet sandwiches stuffed with fresh seasonal vegetables and lean proteins. A light spread of homemade garlic herb butter or a drizzle of extra virgin olive oil with sea salt flakes elevates its simple elegance.
Garnish your slices with a scattering of fresh microgreens or a dusting of smoked paprika for a contemporary twist-making each bite as gorgeous as it is delicious.
| Nutritional Info (per slice) | Calories | Protein | Carbs | Fat |
|---|---|---|---|---|
| White Loaf | 110 kcal | 4 g | 22 g | 2 g |
For more expert insights on yeast and dough science, visit the King Arthur Baking Guide.
Q&A
Q&A: Mastering the Art of Basic White Loaf in Your Bread Maker
Q1: What makes a basic white loaf the perfect beginner bread to master in a bread maker?
A1: The basic white loaf is like the canvas of bread-making-simple yet versatile. Its straightforward ingredients and predictable behavior offer beginner bakers a reliable foundation to understand dough consistency, rising times, and baking cycles without the complication of additional flavors or textures. Mastering this loaf builds confidence and sets the stage for more adventurous bread-making down the line.
Q2: Can I use any type of flour to bake a basic white loaf, or is bread flour necessary?
A2: While you can technically use all-purpose flour, bread flour is your best friend here. Its higher protein content develops more gluten, resulting in that classic chewy crumb and perfect rise. If bread flour isn’t on hand, all-purpose will do, but expect a slightly denser outcome. Avoid whole wheat or specialty flours for your first loaf-they can change hydration needs and texture.
Q3: How significant is the water temperature when activating yeast in the bread maker?
A3: Water temperature is one of the subtle yet crucial factors for a perfect loaf. Too hot,and it risks killing the yeast; too cold,and yeast may awaken sluggishly or not rise properly.The ideal spot is lukewarm-think between 100°F to 110°F (38°C to 43°C). This cozy environment wakes your yeast just right, ensuring a bubbly and active rise.
Q4: How does salt influence the flavor and texture of a basic white loaf?
A4: Salt is the silent hero in bread-making. Not only does it enhance flavor,giving your loaf that satisfying savory note,but it also regulates yeast fermentation and strengthens the gluten network. Without salt, your bread risks being bland, overproofed, or structurally weak-so don’t skip it or skimp too much!
Q5: What is the ideal kneading time setting for a basic white loaf in a bread maker?
A5: Most bread makers have a default kneading cycle that perfectly suits a basic white loaf, typically around 20-30 minutes. This timeframe is sufficient to develop enough gluten to trap carbon dioxide bubbles for a fluffy crumb. If your machine has adjustable settings,stick to the medium or standard knead-less might leave dough underdeveloped; more could overwork it.
Q6: How can I tell if the dough is too wet or too dry during the kneading process?
A6: Peek through the bread maker’s viewing window or pause the cycle to check dough consistency. The dough should be slightly tacky but not sticky or gummy. If it’s sticking excessively to the pan or your fingers, try adding flour a teaspoon at a time. If it’s dry and crumbly, add water similarly. Perfect dough feels elastic and slightly springy-a happy little ball ready to rise.
Q7: Can I customize a basic white loaf recipe with seeds or herbs without risking failure?
A7: Absolutely! Once you’ve nailed the base loaf, adding mix-ins like sesame seeds, poppy seeds, dried rosemary, or thyme can elevate your bread’s character. Just add them when your bread maker signals for additional ingredients, usually after the first kneading cycle. keep the amount moderate-overloading can affect rising and texture.
Q8: What’s the secret to getting a beautifully browned crust without burning?
A8: The bread maker’s crust settings are your palette: light, medium, or dark. Start with medium for balanced coloring. Positioning your machine away from direct sunlight or drafts is also key, as temperature fluctuations can affect baking. For extra crispness, remove the loaf and let it cool on a wire rack where the steam can escape, preserving that perfect crust snap.
Q9: Should I let the loaf cool before slicing? Why?
A9: Patience is a virtue in bread-making-especially when it comes to cooling. Fresh from the oven, your loaf continues to bake internally as residual heat redistributes moisture. Slicing too soon can result in a gummy crumb or squished texture. Waiting at least 30 minutes,ideally an hour,ensures cleaner slices and lets flavors fully develop.
Q10: How often can I expect to bake a basic white loaf in my bread maker without compromising machine longevity?
A10: Bread makers are designed for regular use, so baking a loaf every two to three days is fine for most models. Just keep up with maintenance: clean the kneading paddle and pan thoroughly, avoid overfilling, and let the motor rest between cycles if baking multiple loaves back-to-back.Happy bread-making keeps both your pantry and machine running smoothly!
Key takeaways
As you close the lid on your latest batch of perfectly golden white loaf, remember that mastering this timeless staple is less about following a recipe and more about embracing the rhythm of the bread maker’s gentle hum. Each loaf carries the promise of warm breakfasts, cozy sandwiches, and the simple joy of homemade comfort.With patience, practice, and a sprinkle of curiosity, your bread maker becomes not just a kitchen appliance, but a gateway to the art of baking simplicity. So, keep experimenting, savor the scents, and let the humble white loaf be your first masterpiece on a delicious, dough-filled journey.