


There’s an art to cooking the perfect steak-a delicate balance of heat, time, and technique that transforms a simple cut of meat into a mouthwatering masterpiece. Whether you crave a tender rare center or a rich, smoky well-done finish, mastering the flame is key to unlocking steakhouse-quality results right in your own kitchen or backyard grill. Welcome to your ultimate steak cooking chart guide, where science meets sizzle and flavor takes center stage. Get ready to demystify cooking temperatures, timing secrets, and searing methods that will elevate your steak game from basic to brilliant. Grab your tongs-it’s time to turn up the heat and become the steak master you were always meant to be.
Understanding Steak Cuts and Their Ideal Cooking Temperatures
Mastering the Flame starts with knowing the distinct characteristics of steak cuts and the precise temperatures that bring out their best flavors. Each cut-from the tender, buttery filet mignon to the robust and marbled ribeye-demands a unique treatment to unlock its savory potential. Ribeye shines at medium-rare, revealing a juicy richness when cooked between 130°F and 135°F. Meanwhile, a New York strip calls for slightly higher heat, around 135°F to 140°F, to maintain its perfect chew.
Understanding fat content, muscle structure, and thickness guides your cooking approach-whether grilling, pan-searing, or sous-vide. Temper the room temperature steak before cooking to promote even heat penetration. this foundational knowlege ensures the flame works in harmony with your steak’s natural qualities.
Prep and Cook Time
- Preparation: 10 minutes (including seasoning and resting)
- Cooking: 8-12 minutes depending on cut thickness and doneness level
Yield
- Serves 2-3 people (using a 1-inch thick steak)
Difficulty Level
- Medium - requires temperature control and timing but is accessible for any motivated home cook
Ingredients
- 1 (1-inch thick) ribeye steak, room temperature
- Kosher salt – 1 tsp, freshly ground
- Fresh cracked black pepper – 1 tsp
- 2 tbsp high smoke point oil (grapeseed, canola, or avocado oil)
- 2 tbsp unsalted butter
- 3 garlic cloves, lightly smashed
- 2 sprigs fresh thyme or rosemary
Instructions
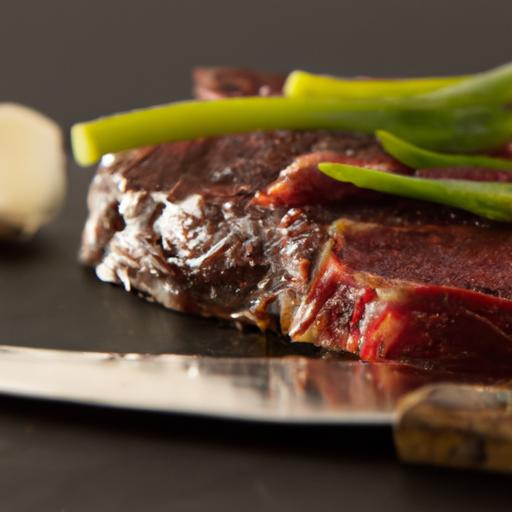
- Season generously. Pat steak dry with paper towels. Season both sides with kosher salt and cracked pepper about 30 minutes before cooking to enhance crust advancement.
- Preheat your pan or grill. Bring your cast-iron skillet or grill to a very high temperature. Add 2 tablespoons of oil once the surface is hot-this is crucial for a flawless sear.
- Sear the steak. Place the steak on the pan without moving it for 2-3 minutes, until a deep brown crust forms. Flip and sear the othre side for an equal time.
- Add aromatics and butter. Reduce heat to medium and add butter, garlic, and herbs. Continuously tilt the pan and spoon the melted butter over the steak for 1-2 minutes for flavor infusion.
- Control the flame. Maintain medium heat to avoid burning, especially during basting. High flames are best for initial searing only.
- Check internal temperature. Use an instant-read meat thermometer: 120°F for rare, 130°F for medium-rare, 140°F for medium, and so forth. This ensures precision and prevents overcooking.
- Rest your steak. Transfer the meat to a warm plate and tent loosely with foil for 5-10 minutes. Resting allows juices to redistribute, elevating tenderness and flavor complexity.
- Slice and serve. Cut against the grain to maximize tenderness and plate with your favorite sides.
Tips for Success
- Know your cuts: Lean cuts like filet mignon require less cooking time, while tougher cuts like flank steak benefit from slower cooking or marinating.
- Use a reliable thermometer: Doneness is in the details-especially when mastering the flame.
- Don’t overcrowd: Cook one or two steaks per pan to maintain heat and sear quality.
- Make it ahead: Season your steak the night before for enhanced dry brining effects.
- Alternative fats: For basting, ghee or clarified butter can be substituted for higher smoke tolerance.
Serving Suggestions
Present your perfectly seared steak atop a wooden board or rustic plate.garnish with sprigs of fresh thyme or rosemary and a pat of compound butter (garlic, parsley, and lemon zest). Offer a side of roasted fingerling potatoes, caramelized shallots, or a fresh arugula salad drizzled with a balsamic reduction. Complement the meal with a full-bodied red wine such as cabernet Sauvignon or Malbec to accentuate the steak’s bold flavors.

| Doneness Level | Internal Temperature (°F) | Texture | Cook Time (mins/inch) |
|---|---|---|---|
| Rare | 120-125 | Cool, red center | 4-5 |
| Medium Rare | 130-135 | Warm, red center | 5-6 |
| Medium | 140-145 | Warm, pink center | 6-7 |
| medium Well | 150-155 | Slightly pink center | 7-8 |
| Well Done | 160+ | No pink, firm | 8-9 |
for further insight into steak science and flavor profiles, visit Serious Eats’ Food Lab. To master side pairings, explore our Grilled Vegetables guide.
Q&A
Q&A: Mastering the Flame – Your Ultimate steak Cooking Chart Guide
Q1: What makes a steak “perfectly cooked,” and how can a chart help?
A1: A perfectly cooked steak balances texture,flavor,and doneness-whether you crave a rare blush or a well-done finish. A steak cooking chart is your trusty compass, mapping out internal temperatures and times so you can hit that sweet spot every time. It’s like having a grill master whispering in your ear!
Q2: How do I use a steak cooking chart effectively?
A2: Start by selecting your steak cut and thickness, then check the chart for recommended internal temperatures and approximate cooking times. Remember to measure the steak’s internal temperature with a reliable meat thermometer-this is the key to accuracy. the chart guides your timing, but the thermometer tells the true tale of doneness.
Q3: What are the basic steak doneness levels I should know?
A3: The classic doneness ladder climbs like this: Rare (cool red center), Medium Rare (warm red center), Medium (pink and juicy), medium Well (slightly pink), and Well Done (fully cooked through). Each level corresponds with a temperature range detailed in your chart, ensuring you know exactly when to remove your steak from the fire.
Q4: Can thickness affect cooking times on the chart?
A4: Absolutely! Thickness is the unsung hero (or villain) of steak cooking. Thicker cuts require more patience and sometimes a two-zone fire: sear over high heat, then finish with indirect heat. Your chart usually provides guidelines based on typical thicknesses,but always adjust by feel if you’re tacking thicker or thinner steaks.
Q5: How important is resting steak, and is it included in the chart’s timing?
A5: Resting is like the encore of a perfect steak performance.Let your meat rest 5-10 minutes post-grill to allow juices to redistribute, resulting in a juicier, more flavorful bite. Most charts focus on cooking time only, so be sure to add resting time separately-it’s worth the wait.
Q6: What’s the best way to measure steak doneness besides the thermometer?
A6: While thermometers lead the pack, the finger test method is a handy skill: gently press your steak and compare its firmness to the fleshy area under your thumb at different grips. With practise, this tactile method can complement your chart, especially when you’re away from gadgets.
Q7: Does the type of grill or cooking method change the chart’s reliability?
A7: Different grills-charcoal, gas, or pan-searing-introduce variations in heat intensity and distribution. Charts provide general guidelines assuming standard grilling conditions. For best results, use the chart alongside your grill’s characteristics, adjusting for flare-ups or slower heat cycles.
Q8: Can I master steak cooking if I’m a beginner using this chart?
A8: Definitely! The steak cooking chart is designed to demystify the process, breaking down cooking into manageable steps based on temperature and time. Paired with a quality thermometer and a little practice, even novice grillers can step into mastery with confidence sizzling on the flame.
Ready to turn up the heat and unlock steak perfection? Keep this guide close, trust your tools, and soon you’ll be mastering the flame like a true culinary maestro.
To Conclude
As the last embers of your flame flicker, remember that mastering the art of steak cooking is both a science and a soulful ritual. With your ultimate steak cooking chart as a trusted companion, you’re no longer guessing; you’re crafting perfection-every time. Whether you crave a tender rare whisper or a bold, deeply seared medium-well, this guide unlocks the secrets to steak nirvana. So fire up your grill, trust your instincts, and let each sizzle tell the story of a truly mastered flame.Your journey to steak greatness starts now-one perfectly cooked cut at a time.