
There’s a special kind of magic that happens when simple ingredients transform into a golden masterpiece, and few desserts capture this enchantment better than the caramelized pineapple upside-down cake. Beyond its glossy, amber-hued crown lies a symphony of textures and flavors-the tender cake beneath, the buttery caramel glaze, and the vibrant, succulent pineapples that steal the show. Mastering this classic treat isn’t just about following a recipe; it’s an art form, a delicate dance of timing and technique that turns humble fruit and sugar into a dazzling centerpiece. In this article, we’ll peel back the layers of this beloved dessert, exploring the secrets behind that irresistible caramel glow and guiding you through the steps to create your own slice of upside-down magic.
The Art of Caramelized Pineapple Upside-Down Cake Magic
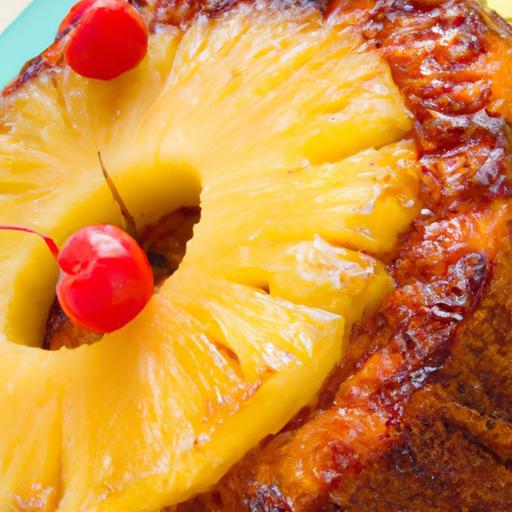
The art of caramelized pineapple upside-down cake magic brings together tropical sweetness, buttery caramel, and a tender crumb in a way that feels like a festivity on your plate. This classic dessert’s roots trace back to American kitchens of the early 20th century, yet its timeless charm remains unforgettable. Each perfectly caramelized pineapple slice creates a glossy, amber mosaic that’s as visually stunning as it is delectably sweet-an irresistible combination that inspires bakers of all levels.
Prep and Cook Time
- Preparation: 20 minutes
- Cooking: 40 minutes
- Total Time: 1 hour
Yield
Serves 8 generous slices
Difficulty Level
medium – perfect for adventurous beginners eager to master gorgeous layering and caramelization techniques
The science Behind Perfectly Caramelized Pineapple Slices
Unlocking the secret to the perfect caramelized pineapple slices begins with both temperature and timing. Pineapple’s natural sugars transform under moderate heat into complex caramel notes through the Maillard reaction, creating a seductive golden-brown sheen. Choosing ripe but firm pineapple is essential; too soft, and your slices will lose structure, too unripe, and the sweetness will fall flat.Before cooking, gently pat the slices dry to prevent excess moisture from interfering with caramelization. Sauté or bake them in a rich butter and sugar mixture, allowing the sugars to melt and envelop each slice in a glossy, amber glaze. The key is patience-slowly coaxing the sugars to dance into caramel without rushing ensures a deep, luscious flavor and texture that melts in your mouth.
Choosing the Ideal cake Base to Complement Pineapple’s Sweetness
The cake beneath the crown of pineapple must balance sweetness with a tender crumb and just enough moisture to soak up the luscious caramel sauce without becoming soggy. A classic yellow cake base with a subtle vanilla note works perfectly – its buttery softness complements the tropical punch of pineapple beautifully. For an extra layer of complexity, folding in a touch of brown sugar or a pinch of ground cinnamon enhances the nostalgic warmth of this dessert. The cake batter should be light enough to rise evenly but rich enough to carry the caramel’s weight. Using cake flour rather than all-purpose flour can yield a finer, silkier crumb that elevates the experience.
Mastering the Caramel Sauce for Deep Rich Flavor
The magic of this upside-down cake lies in its deeply flavored caramel sauce. Start with equal parts butter and brown sugar melted together just until bubbly and fragrant,then swirl in a hint of vanilla extract and a pinch of sea salt to lift the flavors. Heating the mixture slowly prevents burning – a common pitfall that can turn bittersweet and harsh.For a more complex palate, consider a splash of bourbon or rum, which adds aromatic depth and richness to your caramel. Once poured into the pan,it becomes a molten bed under the pineapple slices,while during baking it thickens and caramelizes beautifully – creating the iconic sticky topping that drips with flavor when inverted.
Tips and Tricks for Flipping and Presenting Your Upside-Down Cake Like a Pro
Flipping your cake is the grand reveal and understandably nerve-wracking. to guarantee a prosperous inversion, allow the cake to rest for 10-15 minutes after baking so the caramel cools and sets slightly, preventing a messy slide. Run a thin knife carefully around the edges to loosen the cake, then place a serving plate firmly over the pan. With confidence, invert the whole assembly in one smooth motion. The caramelized pineapple slices should shine atop in a glossy, jewel-like arrangement.
For stunning presentation, garnish the cake with fresh mint leaves, a dusting of toasted coconut flakes, or a drizzle of lightly whipped cream. Serve slices alongside a scoop of vanilla bean ice cream or a dollop of crème fraîche to balance the rich caramel notes with creamy freshness. Remember, clean edges achieved by slicing with a warm, sharp knife allow the tropical mosaic to captivate at first glance and taste.
Ingredients
- For the Caramel and Pineapple:
- 6 tablespoons unsalted butter,melted
- 1 cup packed light brown sugar
- 1 fresh pineapple,peeled,cored,and sliced into ½-inch rings
- Maraschino cherries (optional),for garnish
- For the cake Batter:
- 1 ½ cups cake flour,sifted
- 2 teaspoons baking powder
- ½ teaspoon fine sea salt
- ½ cup unsalted butter,softened
- 1 cup granulated sugar
- 2 large eggs,at room temperature
- 1 teaspoon pure vanilla extract
- ½ cup whole milk,warmed
Instructions
- Prepare the caramel topping: In a 9-inch round cake pan,pour the melted butter and evenly sprinkle the brown sugar.Heat gently over the stove or in the oven until bubbly and smooth, about 3 minutes; then arrange pineapple rings atop in a circular pattern. Place a maraschino cherry in the center of each ring if desired.
- Preheat your oven: Set the oven to 350°F (175°C) while constructing your batter.
- Combine dry ingredients: Whisk together the cake flour, baking powder, and sea salt in a medium bowl.
- Cream butter and sugar: Using an electric mixer, beat the softened butter and granulated sugar until pale and fluffy, about 3-4 minutes.
- Add eggs and vanilla: Incorporate eggs one at a time, beating well after each addition, then mix in the vanilla extract.
- Alternate adding dry ingredients and milk: Gradually add the flour mixture in three parts, alternating with the warmed milk, beginning and ending with flour.Mix until just combined to avoid overworking the batter.
- Pour into pan: Gently spread the batter evenly over the pineapple slices, smoothing the surface with a spatula.
- Bake: Place in the oven and bake for 35-40 minutes until a toothpick inserted in the center comes out clean and the edges pull slightly from the pan.
- Cool and invert: Let the cake cool in the pan on a wire rack for 10-15 minutes. Run a knife around the edge to loosen, place a serving plate on top, and carefully invert the cake.
- Serve: Slice warm or at room temperature with suggested garnishes.
tips for Success
- Choose fresh pineapple over canned for the best flavor and texture.
- If you prefer a gluten-free option, substitute with a gluten-free flour blend designed for baking.
- For an extra moist cake, substitute half the milk with coconut milk to echo the tropical theme.
- Make ahead: Prepare the caramel topping and pineapple slices a day in advance and store covered in the pan; assemble and bake fresh the next day for ease.
- To prevent sticking, thoroughly grease your cake pan and consider lining it with parchment paper cut in a circle.
- For precise caramelization, keep an eye during baking; if browning too quickly, tent lightly with foil.
Serving Suggestions
Serve slices with a scoop of vanilla bean ice cream or freshly whipped cream for cooling contrast. Garnish with radiant green mint leaves or toasted coconut flakes to add texture and color dimension. A drizzle of rum-spiked caramel sauce highlights the luxury of this classic dessert and amps up the tropical vibes.

| Nutritional Info (per slice) | Calories | Protein | Carbs | Fat |
|---|---|---|---|---|
| Caramelized Pineapple Upside-Down Cake | 370 kcal | 4 g | 55 g | 14 g |
For more tropical baking delights, explore our Tropical Fruit Desserts Collection. discover the step-by-step science of caramelization on Science of Cooking for deeper insights into sugar chemistry.
Q&A
Q&A: The Art of Caramelized Pineapple Upside-Down Cake Magic
Q1: What makes a pineapple upside-down cake truly magical?
A1: The magic lies in the harmonious dance between rich caramel and juicy pineapple slices, crowned with a tender, buttery cake. It’s a sensory spell – the caramel’s amber glow, the pineapple’s tropical tang, and the cake’s moist crumb weaving together to enchant every bite.
Q2: Why is caramelization so critically important in this cake?
A2: Caramelization transforms sugar into a complex, amber-hued syrup bursting with deep, nutty flavors. when pineapple sits in that liquid gold, it absorbs and amplifies these notes, turning ordinary fruit into something lusciously decadent. Without caramelization,the cake loses its soulful,golden crown.Q3: How do you achieve the perfect caramel for this cake?
A3: Patience is the secret ingredient. Gently heating sugar until it melts and slowly darkens develops that rich color and flavor without bitterness. Watching the sugar bubble and swirl is like watching an alchemist’s potion – once it reaches a deep amber, it’s time to fold in butter and maybe a hint of vanilla for enchantment.
Q4: Can fresh pineapple be used, or is canned better?
A4: Both have their charms. Fresh pineapple offers vibrant, juicy brightness and a firmer texture, while canned pineapple provides consistent sweetness and tenderness. The choice depends on your desired texture and availability – fresh for a lively zing, canned for smooth, classic comfort.
Q5: How can you make sure the pineapple slices stay perfectly placed during baking?
A5: The secret is in the caramel layer’s stickiness and a careful arrangement. Pour the warm caramel into the pan first, then gently nestle the pineapple slices on top, pressing just enough to anchor them without breaking. The cake batter’s gentle pour seals the design, preserving this edible mosaic.
Q6: What kind of cake batter works best beneath the caramelized pineapple?
A6: A buttery, vanilla-scented batter with a tender crumb attuned to absorb caramel’s moisture is ideal. Classic butter or yellow cake recipes, enriched with sour cream or buttermilk for moistness, create a luscious base that balances sweetness with a subtle tang.
Q7: Any tips for flipping the cake out of the pan without breaking the caramel design?
A7: Yes! Allow the cake to cool slightly but not entirely – about 10 to 15 minutes is perfect. Run a thin knife around the edges to loosen it, then place a serving plate face-down over the pan and flip confidently in one smooth motion. A moment of suspense, then the magical reveal.
Q8: How can you elevate this classic dessert into a show-stopper?
A8: Embrace creativity! Add a sprinkle of toasted coconut for tropical crunch, a dash of warm spices like cinnamon or ginger to deepen the flavor, or layer pineapple with ripe stone fruits such as peaches for a summer symphony. finish with a dollop of whipped cream or a scoop of vanilla bean ice cream for a truly enchanted finale.
Q9: is this cake better served warm or at room temperature?
A9: Both have their charm. Warm, it’s a molten indulgence, with caramel and pineapple juices still mingling with the cake. Room temperature allows the flavors to settle and intensify, offering a more cohesive, tender slice. Either way, it’s a little slice of sweet magic.
Q10: Why does pineapple upside-down cake continue to captivate bakers and eaters alike?
A10: Because it’s more than cake – it’s nostalgia, a celebration of transformation from humble ingredients to golden bliss. It combines simplicity and showmanship, comfort and surprise, reminding us that with a little caramel magic, everyday moments can turn unforgettable.
To Wrap it Up
mastering the art of caramelized pineapple upside-down cake is more than just following a recipe-it’s about embracing the alchemy where buttery caramel meets tropical sweetness, transforming simple ingredients into a golden, glistening masterpiece. Each slice tells a story of patience, precision, and a touch of magic in the kitchen.So next time you gather around the table, let this luscious cake be your invitation to share the joy of crafting something truly enchanting, where every bite is a celebration of flavor and technique perfectly intertwined.